Panoramas
Panoramas are really good fun. Many cameras have a built-in panorama function. Taking a panorama image involves shooting multiple overlapping images and stitching them together using software.
My little Olympus XZ-1 can do a 3 image hand-held panorama. It has a nifty function showing how far you have to move the image to take the next one. Three images is a bit of a limition, especially if you want to do a full 360 degree panorama. Another problem with hand-held panoramas is that the rotation axis inevitably changes. For far-away features, ie landscapes, this is not a problem.
Hand-held panoramas are fine for far away landscapes. However, if the scene contains foreground features you have to be careful to avoid parallax errors. The trick is to rotate the camera about the entrance pupil of the lens. The entrance pupil can be found by rotating the camera whilst looking at something in the foreground. The camera is moved backwards/forewards until the apparent position of the foreground does not change relative to the background. I have used a cake cooling rack for the foreground and a scene of cushions for the background. Have a look at John Houghton's post which describes finding the no-parallax point in more detail.
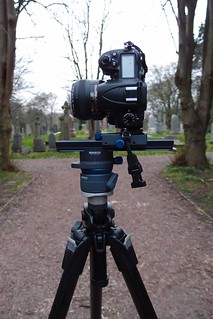
For single row panoramas, the camara is mounted on a special panoramic head (Novoflex PANORAMA=Q) which only allows rotation about its central axis. The tripod head has to be level. In the past I just adjusted the tripod legs. I have recently added a levelling base (Novoflex MagicBalance) which is essentially a half-sphere that can be locked. For multirow panoramas the camera is mounted on a large L-bracket (also from Novoflex) allowing rotation about two axes. As the camera needs to be moved backwards so that the rotation axis goes through the entrance pupil I have added my macro rail (Novoflex CASTEL-Q) to the setup.
I usually shoot in portrait mode to increase the resolution. I select the lens for the desired aspect ration of the final image. If it is not too bright or dark, I use the markings on the live-view monitor to figure out how much I need to rotate the camera which has handy lines at quarters of the frame. If I cannot use the live-view monitor I use the markings in the view finder. Depending on the shutter speed I use a remote control to avoid camera shake.
The table below shows the lenses I typically use for panoramas, the horizontal and vertical angle of view of a single frame on my d7000 DX sized sensor and the distance to the entrance pupil. The distance is read from the markings on the macro rail.
| lens | focal length | horizontal angle of view (DX) | vertical angle of view (DX) | distance to pupil |
|---|---|---|---|---|
| Nikon AF-S Nikkor 35mm 1/1.8G DX | 35mm | 37.26° | 25.13° | 1.7cm |
| Nikon AF-S NIKKOR 50mm 1/1.8G | 50mm | 26.56° | 17.73° | 1cm |
| Nikon AF-S VR Micro-NIKKOR 105mm f/2.8G | 105mm | 12.82° | 8.5° | 2.4cm |
| Nikon AF-S DX Zoom-NIKKOR 12-24mm f/4G IF-ED | 12-24mm | 5.5cm |
Processing the Panoramas
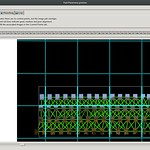
Once the images are taken I stich them using hugin which is freely available. Hugin can handle huge panoramas, although they take a while to compute. I have also tried HDR and exposure fusion panoramas which are both supported by hugin. They take seriously long and so far I am not yet convinced it is worth while (although this might be more due to my attitude towards HDR). Once the panoramas are stiched using hugin I use the gimp to tidy up the panorama: mostly adjusting crop, contrast, curves and finally sharpen the image. One issue, especially with multipanoramas is that they get quite big. Normal tiff files have a limit of 4GB and hugin cannot produce big tiffs which removes this limit at the moment. An alternative to producing tiffs is jpegs which support a maximum resolution of 65535×65535 pixels.
Shooting Macro Mosaics
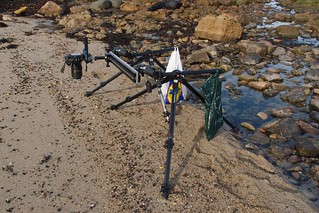
Another fun thing to do is trying to stich macro images. Traditional (single row) panoramas are cylindrical which makes macro panoramas tricky. On the other hand macro mosaics are relatively easy to handle provided a long enough rail.
This works particularly well for reasonably flat surfaces (the beach). The camera is moved horizontally along a rail. Even though the beach is relatively flat there is still some topography (the shells stick out from the plane). These variations have to be corrected for using photogrammetric processing. As a bonus a 3D mesh can be generated.
Displaying Panoramas
Displaying panoramas is surprisingly tricky. Obviously they can be presented as a single image. A single, static image will show distortions depending on the field of view, aspect ration (focal lenght of the lens) and the projection used. These distortion can add to the image. However, showing a single static image will not make use of the huge resolution of stitching many images.
An interactive viewer will only show part of the panorama and can remove some of the distortion. The viewer can also use images at multiple resolutions allowing the user to zoom in and out of the image.
After some experimenting I have settled on using krpano which fits well into the frame work of this webpage. It uses HTML5 (I have disabled flash support) and supports multiresolution images and partial panoramas. Check out some of my panoramas in my panorama gallery.


